The Mighty Lego Robot:
With this project, we constructed a robotic vehicle with a program through Legos called Legos Mindstorm. This page includes the construction of the robot and the programming process. This is a highly interactive process that requires students to experiment and problem solve. The programming has a similar feel to the Sphero.
First Task: BUILD with Legos
The first task was to visit the Lego Quest website to construct an object that would fulfill one of the tasks given. Kids of all ages build a creation with Legos and post pictures and descriptions online. Some of the quests include building a creature, creating a scene from a favorite book, or even designing a flag.
For this particular project, I designed something for the "Spring" Quest. This task was to represent Spring with the Legos. Bees often come to mind when I think about Spring. They pollinate the flowers that will bloom and are an important part of the ecosystem. Here is the bee I created as well as the link to the Quest...

After building and wiring the Robot car using designs from the Lego program, we programmed it to follow a particular path. The task was to program the robot to move a lego "brick" and back away from it, eventually hiding behind our creation (i.e. the bee). We were to pretend the brick was dangerous and we needed to get away and hide as quickly and carefully as possible. The creation of a fun story allows students to engage in the problem in a creative way. It allows them to build on it as far as they want.
Here is the finished program to my robot!

THE PROGRAM:
Three main commands...
-
Steering-that controlled the turning of the robot.
-
Driving/Distance-the controlled the speed of the robot, the direction it would move, and the distance the robot would travel.
-
Motor- this program controlled moving the arm we attached up and down.

Meet the Robot
When you adjust the STEERING, you change the speed of the turn. In this case, the wheel attached to Port B is turning at -50 while the wheel attached to Port C is turning at 50. One is negative so they are turning in different directions. This allows the robot to turn. This takes experimenting. The speed of "5o" is a quick turn, but you can adjust the speed to create the speed of turn that you desire.
To figure out which wheel needed to be at -50 and the other at 50, I just tested it until I got the desired turn.

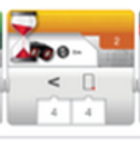
This controlled the sensor that is at the front of the car. This command told the robot to stop moving when it detected an object within 4 cm of itself. This allowed the robot to stop within view of the "brick" we created. These measurements can be adjusted.

This program controls the distance and speed the robot will travel. The first tab adjusts the direction the robot is moving towards. This is similar to the Sphero in that we can change the path the robot is traveling. In this case, I wanted the robot to move forward.
The second tab is the speed. This is directly correlated to the following tab. This tab adjusts the number of rotations the tires make...
The speed + The # Rotations = Distance
To adjust how far the robot moves involves adjusting one of these variables. When I needed the robot to travel farther, I could increase the number of rotations at the same speed. I could also change the speed to make it move faster therefore allowing it to travel more distance in one rotation. In this case, I kept the speed low and increased the number or rotations.

The motor could also be programmed to move the arm we attached down. This allowed the arm to move over the brick and move it around. The first tab adjusts the speed. We used 0.4 in the second tab to adjust how far down the arm would move. It does not move in a complete 360 degree turn.